diy wooden planter stand for multiple plants is one of those weekend projects that instantly fixes a real problem, too many pots crowding windowsills, uneven light, and that constant drip tray shuffle every time you water.
If you want your houseplants to look intentional instead of accidental, a multi-tier stand helps in three ways, it stacks vertical space, it groups plants by light needs, and it makes cleaning around them less annoying.
One quick note before we get into cuts and screws, the “best” stand design depends on what you actually own, a few light pothos are different from three heavy ceramic planters and a watering can parked on the bottom shelf. We’ll build around that reality, not a perfect Pinterest setup.
Plan first: size, capacity, and where it will live
The layout decision that saves most headaches is picking the stand’s footprint based on your space, not your plant count. Plants multiply, but corners and wall lengths stay the same.
Start with three measurements, width of the spot, max depth you can tolerate without bumping into it, and the tallest plant you plan to place on the top tier. If the top shelf sits too high, watering becomes a balancing act.
- Typical footprint for apartments: 24–36 in wide, 10–14 in deep
- Comfortable top-tier height: 28–40 in for most people
- Good tier spacing: 10–14 in so leaves can breathe
According to OSHA, good housekeeping and clear walking surfaces reduce trip hazards in indoor spaces, so avoid designs that stick into a main walkway or force cords and drip trays into the path.
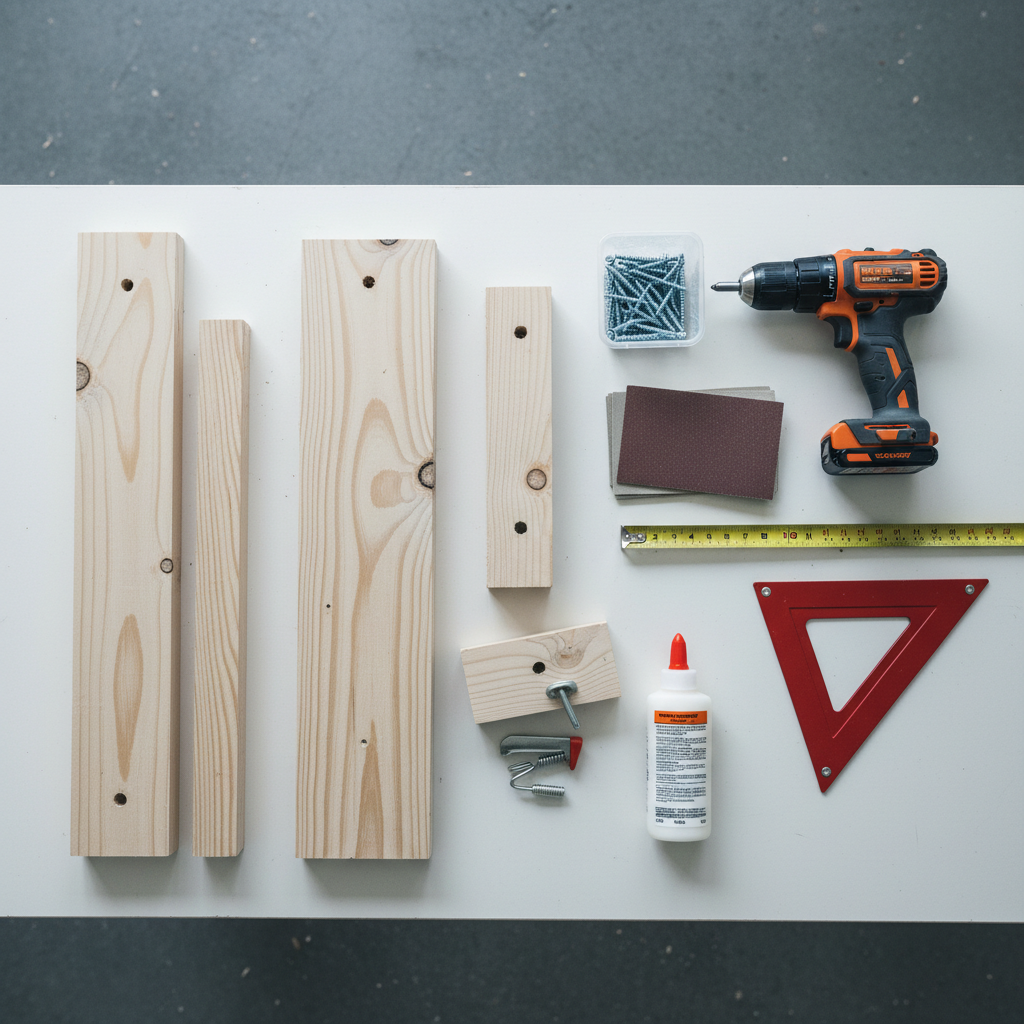
Materials and tools (with practical substitutions)
You can build a solid stand with basic dimensional lumber. For most indoor use, construction-grade pine works, but choose straight boards, fewer knots, and let them acclimate indoors for a day so they don’t twist after you cut.
Materials
- 1x3 or 1x4 boards for legs and rails (pine or poplar)
- 1x6 or 1x8 boards for shelves (or laminated smaller boards)
- 1-1/4 in wood screws (or pocket-hole screws if using a jig)
- Wood glue (optional but helpful for stiffness)
- Sandpaper (120 and 220 grit)
- Finish: wipe-on polyurethane, water-based poly, or interior paint
- Felt pads or rubber feet
Tools
- Tape measure, pencil, speed square
- Drill/driver, drill bits, countersink bit
- Saw (miter saw is convenient, circular saw works fine)
- Clamps (nice to have, not mandatory)
If you’re short on tools, build with straight butt joints and pre-drill carefully. Pocket holes look cleaner, but they’re not required for strength if you use proper bracing.
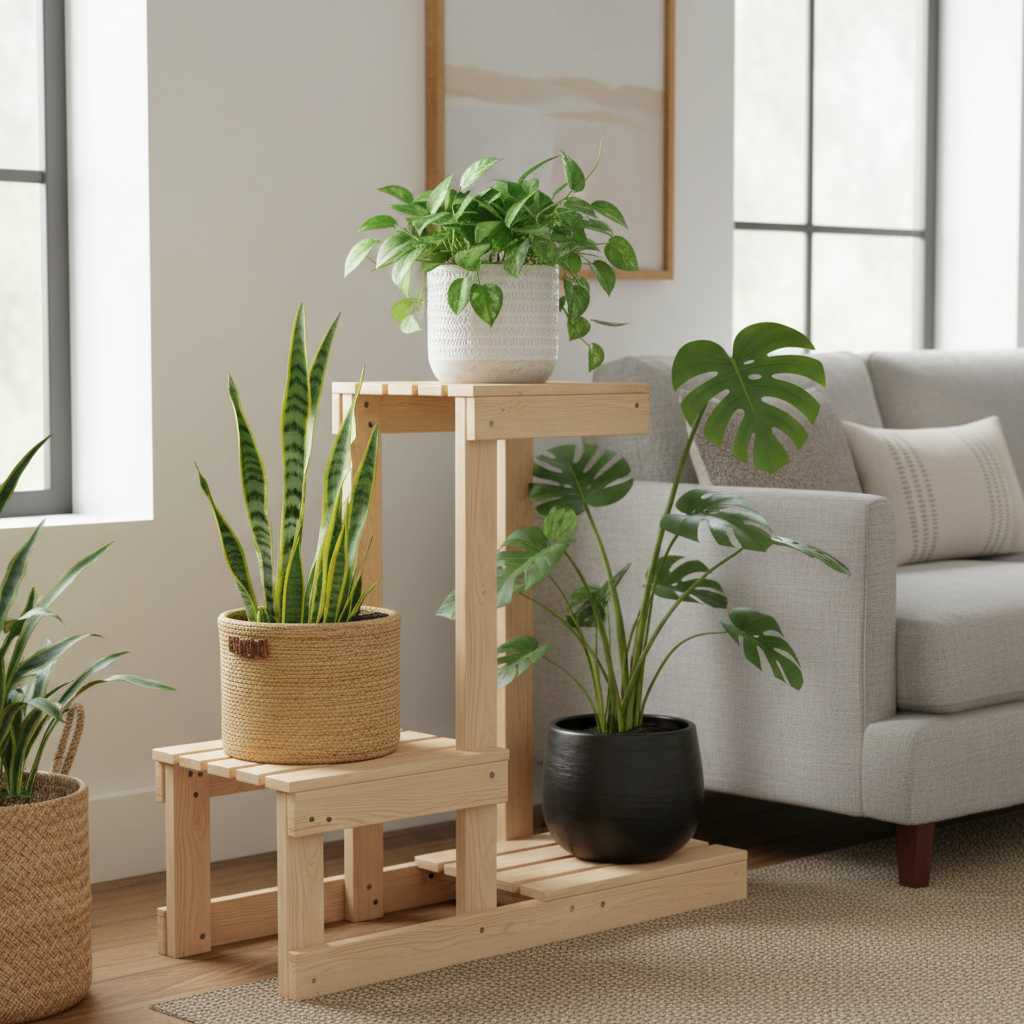
A simple, sturdy 3-tier design you can actually build
This design is basically two ladder-style sides connected by shelf supports. It’s stable, forgiving if your cuts are slightly off, and scales up or down without changing the concept.
Recommended dimensions (adjustable)
- Overall: 30 in W × 12 in D × 36 in H
- Shelves: bottom 30 in, middle 24 in, top 18 in (visual “step” effect)
- Tiers: bottom at 6 in from floor, middle at 20 in, top at 32 in
Cut list (example)
- Legs: 4 pieces at 36 in (1x3 or 1x4)
- Side rails: 6 pieces at 12 in (support shelf depth)
- Front/back rails: 6 pieces at 27 in (stand width minus leg thickness)
- Shelf boards: as needed to reach each shelf width (for 1x6, plan 2–3 boards per shelf)
Real-world tip, if your pots are wide, you’ll care more about shelf depth than tier count. A cramped shelf makes watering messy, and leaves end up pressed against the wall.
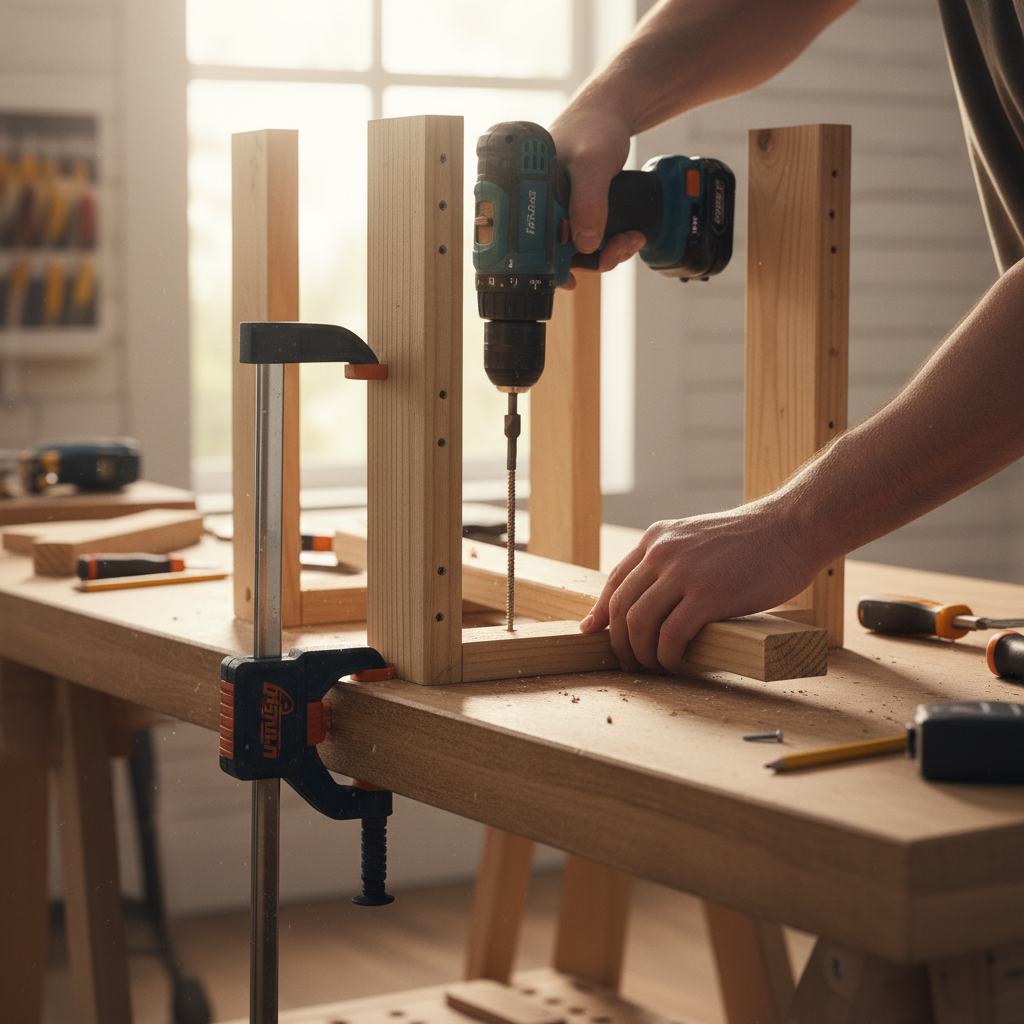
Build steps: from square frame to finished stand
If you do nothing else, do this, keep everything square. Most “wobbly stand” issues come from rushing assembly, not from the wood itself.
Step-by-step
- Sand before assembly with 120 grit, it’s faster while parts are flat.
- Build two side frames, attach three side rails to two legs at your chosen tier heights, pre-drill and countersink to reduce splitting.
- Connect side frames using the front/back rails, check for square by measuring diagonals, adjust before tightening screws.
- Add shelf supports if needed, a small cleat under each shelf edge helps with heavier pots.
- Install shelf boards, leave a small gap (about 1/8 in) between boards for drainage trays and easy cleaning.
- Stabilize, if it racks side-to-side, add a diagonal brace on the back or a thin plywood panel.
For a diy wooden planter stand for multiple plants, diagonal bracing is the quiet hero, especially on taller stands or if kids and pets brush past.
How to choose a finish that survives watering
Indoor plant furniture fails at the same spot, water rings, swollen end grain, and mildew in the corners. A decent finish prevents most of that, but only if you seal edges well.
- Wipe-on polyurethane: durable, forgiving, good for beginners
- Water-based poly: low odor, clear look, dries fast, can raise grain so sand lightly between coats
- Interior paint: hides knots and mismatched boards, but still prime and seal for water resistance
According to EPA, indoor air quality can be affected by some finishes and solvents, so ventilate well and follow the product label, and if you’re sensitive to odors, water-based products usually feel easier to live with.
Also consider a practical add-on, a thin waterproof shelf liner or individual plant saucers. Finish protects wood, but saucers protect your sanity.
Quick self-check: is your stand design strong enough?
Before you load it up, do a simple check. It takes five minutes and can prevent a cracked pot or a collapsed tier.
- When you push the top corner gently, does it sway more than you expect?
- Do shelves flex when you press down with your hand?
- Are screws biting cleanly, or did any strip out in soft wood?
- Is any leg rocking on the floor, even slightly?
- Do you have at least one form of anti-rack support, diagonal brace or back panel?
If you answer yes to sway or flex, add a back brace and a center support under longer shelves. Many people try thicker shelf boards first, but bracing often fixes more with less material.
Common mistakes (and what works better)
Most “fails” aren’t dramatic, they’re just the small annoyances that make you stop using the stand the way you planned.
- Making shelves too narrow, pots don’t sit centered, watering runs down the sides. Better, give yourself at least 1 in margin around the largest saucer.
- Skipping pre-drilling, pine splits near ends and joints loosen. Better, pre-drill and countersink every screw near board ends.
- No back support, the stand feels fine empty and sketchy loaded. Better, add one diagonal brace early.
- Overbuilding the top tier, tall and heavy plants up high raise the tipping risk. Better, heavy pots low, trailing plants up high.
And yes, a diy wooden planter stand for multiple plants can tip if it’s narrow and top-heavy. If you have kids, pets, or an uneven floor, wall anchoring becomes a reasonable safety upgrade. If you’re unsure about anchors in your wall type, a local hardware store or a contractor can help you choose the right fastener.
Options table: pick the build that matches your space
If you’re stuck choosing a design, this table helps you commit without overthinking. These are patterns that tend to work in typical US homes and apartments.
| Build style | Best for | Pros | Watch-outs |
|---|---|---|---|
| 3-tier step stand | Corners, small living rooms | Good light layering, easy access | Needs bracing if tall |
| Long bench with 2 levels | Under windows | Stable, easy to water | Uses more floor space |
| Wall-adjacent ladder stand | Narrow spaces | Small footprint, looks clean | Often needs wall anchor |
| Plant stand with bottom storage | People with tools and soil bins | Keeps supplies together | Can get cluttered fast |
Key takeaways before you start cutting
- Design around the biggest pot, not the smallest plant.
- Bracing beats bulk, a simple diagonal back brace often matters more than thicker shelves.
- Seal edges, end grain drinks water first.
- Heavy goes low, stability is mostly placement, not just carpentry.
If you want one action step, measure your space and your largest saucer today, then sketch the footprint and tier heights. That small step turns this from “maybe someday” into a build you can finish.
Conclusion: build it once, then enjoy the plant corner
A good diy wooden planter stand for multiple plants is less about fancy joinery and more about making plant care easier, water without juggling, rotate for light, and keep leaves from turning your windowsill into a traffic jam. Keep the design simple, brace it well, seal it, and you’ll end up with a stand that looks like furniture instead of a temporary fix.
If you’re ready, pick one of the layouts above, buy straight boards, and build the frame first. Once it stands solid on its own, everything else, shelves, finish, styling, becomes the satisfying part.
FAQ
How much weight can a DIY wooden plant stand hold?
It depends on shelf span, bracing, and joint quality more than the wood species. Shorter spans with a back brace usually handle typical houseplant loads, while long, unbraced shelves flex sooner, when in doubt, add a center support and keep heavy planters on the bottom tier.
What wood is best for an indoor planter stand?
Pine is common and affordable, poplar paints nicely, and hardwoods look great but cost more. For indoor use, straight boards and a sealed finish matter more than chasing an “ideal” wood.
Do I need a waterproof finish if I use saucers?
Saucers reduce risk, but splashes and damp soil still happen. A basic polyurethane or water-based poly makes cleanup easier and helps prevent swelling at edges, especially on shelf seams.
How do I stop the stand from wobbling?
Check for floor rocking first, felt pads can fix small issues. If the frame sways side-to-side, add a diagonal brace on the back or screw on a thin plywood panel to stop racking.
Can I build this without a miter saw?
Yes, a circular saw with a guide works, and many stores cut lumber for you if you bring a cut list. The bigger factor is accurate measuring and consistent cuts so the frame stays square.
Is it safe to anchor a plant stand to the wall?
In many homes it’s a smart safety step, especially with tall stands, kids, or pets. Use anchors rated for your wall type and the expected load, and if you’re uncertain about studs or masonry, it’s reasonable to ask a handyman or contractor.
How far apart should plant stand shelves be?
Many people land around 10–14 inches, then adjust based on leaf spread. Give extra headroom for plants that grow upward fast, and keep the top tier low enough that watering still feels comfortable.
If you’re building a multi-tier stand but want it to look like it belongs in your room, not your garage, it can help to choose a simple finish schedule and a consistent pot style, and if you’d rather skip the design math, start from the example cut list and just adjust the width to match your space.